Wednesday

National Food on a Stick Day

 There is a holiday for everything and today is National Food on a Stick Day!  when the producers of KUTV's Fresh Living asked me to come up with something to celebrate this fun day, I knew it had to have our family's favorite pizza and salad!   We love pizza of all kinds, but for our picky little ones it has to be fun.  So, we decided to make them like we do our cinnamon rolls and add a stick.  This recipe is so quick, simple, and easy.  You can whip it up on the busiest of nights and feel like a hero!

All you need to gather is a can or two of Pillsbury Refrigerated Pizza Dough, your favorite sauce, some cheese and chopped toppings.  I love this dough.  It is soft and super easy to work with and best of all, it tastes as good as my own homemade dough.  

Pillsbury Refrigerator Pizza Dough 
 Roll the dough out on a floured surface and square the edges.  Spread your favorite sauce on lightly.  If you use too much sauce or toppings they will cook out of the roll when baking.  Spread to the outside short edge and leave a quarter inch naked on both long ends so your dough roll will stick together.

Spread Marinara Sauce to outside short edge.  Leave long edge naked.
 Lightly spread on cheese and toppings that have been chopped small.  This is a key need so that you can cut the rolls and not loose any of the goodness.

Add cheese and chopped toppings.
 Roll the dough towards you to make a big pizza dough log.  Using waxed or unwaxed non-flavored dental floss to cut the rolls.  Take a piece a couple of feet long and slide under the log.  Lift up the ends of the floss, cross over and pull down.  This "cuts" the dough into nice chunks.  

Roll lengthwise like a cinnamon roll.  Squeeze long edge together.
 When you are done cutting your pieces, place them on a parchment lined tray and lightly press down on the rolls to flaten them out a little.  Pinch the ends that may come loose in cutting, or tuck them under the roll.  

Cut 1.5" lengths with a unflavored dental floss. Place on parchment lined baking sheet.
 Bake at 400 degrees for 10 to 12 minutes until everything is bubbly and the dough is lightly golden brown.  Let cool slightly before sticking the sticks in.

Bake for 10 to 12 minutes at 400 degrees.  Let cool slightly.
 The sticks I use for my rolls or pies on a stick I get in the hardware section of my local shop.  I cut them to 10 inches and use a pencil sharpener to make a point on one end.  This allows me to slide it into pastry perfectly.   They can be washed with hot soapy water and used again and again.

Stick wooden dowels into each roll.  
 For the Salad on a Stick, I used iceberg lettuce, cherry tomatoes and chunks of mozzarella cheese.  For these sticks I used wood skewers that you can get at any grocery store.  Soak them in water for a few minutes and slide your fixings on.  To serve, drizzle a little dressing on or have a dipping dressing on the side.  These are so yummy and make eating salad so fun!

Finish off dinner with Salad on a Stick.
We made several different types of pizza rolls.  One was a Chicken Bacon Alfredo which had Alfredo sauce, Chopped Rotisserie Chicken Breast,  Fresh Parsley, Hormel Real Bacon Bits,  Chopped Olives, and Mozzarella Cheese.  Oh, man was it good!  

Our favorite though was the Chicken BBQ Pizza Roll which we used BBQ Sauce, Chopped Rotisserie Chicken Breast, Chopped Red Onion, Chopped Green Pepper and Mixed Cheddar and Mozzarella Cheese.  The red onion was amazing in this pizza roll.  

Catch the segment on KUTV Fresh Living!

So, whether you add a stick to these pizza rolls or eat them without, they are our favorite way to eat pizza now!  You can catch the segment on KUTV Fresh Living.  We hope you enjoy this crazy fun holiday and use this recipe for brunches, dinners, and late night snacks throughout the year!


Read more »

Tuesday

Spring Hoop Art Embroidery

Happy Spring!  It seems like this first day of spring in the beginning of the year.  Though I love the winter for it's white and bright, I really love spring and the renewal of everything.  We have baby chicks, puppies due next month and our rhubarb is already sprouting!  I'm sure we will have a few more flakes of white living on the mountain, but a new hope is here today.

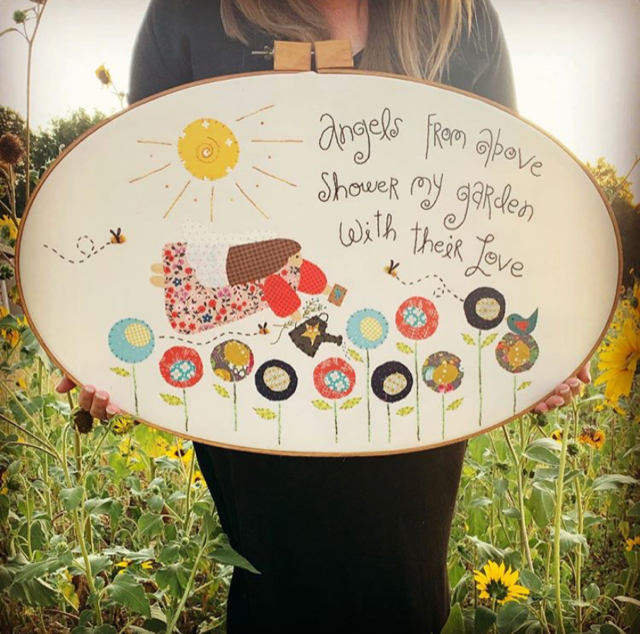
Today new to The Shop is our Spring Hoop Art Embroidery Kit.  It is a simple, wreath with flowers popping up, buds blooming and a couple of bees taking a peek at all the new colors!


Spring Hoop Art Embroidery 

Our kits come complete with everything you need to begin and finish your hoop art piece.  We also offer three colors of the wood hoop, natural, stained, and black.  We also link you to our You Tube Channel where you can watch all of the stitches used in this Spring Hoop Art.


This embroidery is a part of a four part or seasonal group.  The four hoops are so fun together with their bright colors and seasonal flowers.  The kits are on sale through April!  If you are itching to get stitching this year, this is a simple and fun set to begin on.  

We hope you are seeing a little more color in your part of the world and have a beautiful first day of spring!


Read more »

Wednesday

Flying Swallow Barn Quilt

There are several classic quilt patterns that I have always loved and I am so happy to have patterned and painted one of my all time favorites, the Flying Swallow.  Whether made with brights or lights it is a pattern that moves and turns.  We have it in The Shop in four sizes with custom colors available.


Flying Swallow Barn Quilt

I have sent the pattern off to our graphics team to get the pattern completed for next week's workshops in Iowa and will add it to the shop as soon as we receive it.  I am already painting my next Flying Swallow Barn Quilt in brights and can't wait to share it soon.


Read more »

Belle Prairie Barn Quilt Collection

We are so excited to introduce our new Block of the Month Barn Quilt, the Belle Prairie Collection!  The idea for this collection came from our visit last summer to Belle Prairie Nebraska which was the place my Grandmother's Great Grandfather homesteaded.  The rolling hills waving in grain and wildflowers filled my soul and I wanted to create a collection that shared these prairie florals and their special meanings.  


The collection showcases twelve prairie flowers with their meanings, such as Queen Anne's Lace for Devoted Love and the lovely Coneflower which means Abundant Blessings.  I thought I had a favorite, but after painting each one I honestly can say I love them all.   Each month's flower is painted or kitted for a 16" planked hexagon!  The shapes and colors are amazing together.


In the coming month's we will be adding our Belle Prairie Quilt to the collection, as well as many embroidery and wool projects with these adorable flowers.  There are a few other Belle Prairie surprises which I will keep to my heart for now.


I hope you love this collection as much as I do.  It has been months and months in preparation and I can honestly say it is more than what I imagined.  We are heading to Belle Prairie in a few weeks to photograph this beauty on the plains of Nebraska where it all came from.  It will be a special moment for me and I can't wait to share it with you.  For now though, we hope you will want to paint, sew, and stitch the florals of Belle along with us this year.

Read more »

Tuesday

Blooming Bees Ribbon Embroidery


Our newest ribbon embroidery sampler is here!  You all know how much I love hand embroidery of all kinds, but I do have to say that my absolute favorite in the timeless art of ribbon embroidery.  The texture and richness of color you get by hand stitching silk ribbons into florals and leaves is incomparable to any other embroidery.   


Just look at those woven roses and feathered leaves!  The way a ribbon turns through a needle and fabric is so close to the arch in a real flower and honestly it is fairly simple to learn.   This Thursday I will be teaching two Beginning Ribbon Embroidery workshops at the USU Sewing and Textile Conference.  I am so excited to share this art with educators who will then share it with their students.  We will be sharing this workshop throughout this year in several places so keep an eye out for upcoming dates.


Until then, we have these finished Blooming Bee Samplers in Our Shop as well as kits for making one yourself.  Each kit comes with everything you need to make one of these hoops as well as link to our online tutorials, so even if you can't make it to our hands on workshops, you can follow along and learn what you need to.  


So, whether you want a Tweetle Dee Ribbon Embroidery Hoop Sampler or a DIY Kit we have you covered.  Also, our Spring 25% Sale is still going through March 16th!!!  Use code SPRING at checkout to get 25% off everything on our site.  Happy stitching, painting, or whatever you like to do.  


Read more »

Friday

Fairy Tale Toast

The top food trends this year have everything to do with breakfast.  It should be no surprise to any of us, as it is the first meal of the day and we all need a little something special to get us going.  One of my favorites was the decorated toasts...yes, toast.  It is so simple and quick to make which is a blessing to busy moms and grandmoms.   We are calling our creations Fairy Tale Toast.

Princess Unicorn
The ingredient list you need for these Fairy Tale Toasts are super easy to pick up and store in your fridge and pantry.  You need a hearty bread such as Jack Sprat Wheat Bread, an artisan bread or even an English muffin would do.   The base of the "frosting" is simple whipped cream cheese that you can find in your dairy section.  If you want to cut calories you can use the low-fat option.  


Three Little Bears & Friends

There are two ways you can approach Fairy Tale Toast.  First is a super healthy version with the dyes made from natural ingredients.  Meaning, no artificial coloring.  Or you can use regular food/gel coloring.  I have used both and our kiddos ate both versions up without even knowing the difference.  However,  there is a taste to the natural ingredients that you may not like.  It's really a personal preference.  My opinion is that is you are doing something out of the ordinary a little coloring and a sweet treat does not hurt.

For the natural coloring use - 

Red/Pink - Freeze Dried Strawberries
Blue/Green - Spirulina Powder (Found at most health food stores)
Yellow - Ground Tumeric
Purple/Blue - Acai Powder or Freeze Dried Blueberries

Just add a little of these powders to whipped cream cheese and blend with a spoon until the color is thoroughly distributed.  Hint  - If you want you children to help make the "frostings" mix the powders in a little ahead so they don't know where the colors came from.  I had mine grind the freeze dried strawberries in a Ninja to make the powder.  When they asked about the green/blue powder I told them it was from a green berry.  Yes, I told a white lie, but it got them to eat the whole thing...and they loved it!  So, healthy versions work.


However, if you do not want to mess with the natural powders or expend the cost of the ingredients, you can use simple gel food coloring.  I like the gel because the color is more vibrant and it holds up with the whipped cream cheese.

I like to take a little plastic container that has a lid and add the cream cheese to it.  Add in the coloring and mix with a spoon until the color is all the way mixed.  I like mixing them in a plastic container because I can screw the lid on and keep the extra in the fridge for the next time we want something fun on our toast.


Once you have your "frostings" (whipped cream cheese) ready you can place them on the counter with some smooth knives and let the kiddos decorate their toast.  You can create ocean scenes, rainbows, teddy bears, unicorns, and just about any other magical thing you wish.  After they are frosted...it is time to finish your masterpieces.


Now for toppings!  I love to place a variety of toppings out for the kids to decorate their toast, but if you wanted to surprise them with a unicorn or teddy bear I think they would love it still the same.  Gather together some berries, sliced bananas, avocado, nuts, or any other fresh topping you like.  Remember to make it colorful and look at it as if it is a art piece.

For the not-so-healthy options I love marshmallows for clouds, licorice ropes for hair and eyes, Buggles for horns, of course you need glitter and sprinkles which can be found in most cake decorating isles.  I also like to use fruit leather for shapes like the beanstalk for our Jack in the Beanstalk and for leaves too.  Just use your food safe scissors to cut out shapes and lay over the whipped frostings.


Rainbows and Magic Dust

You can see how fun these Fairy Tale Toasts can become.  With the cream cheese mixed in containers and a little stash of topping goodies in the pantry, you can whip up a special breakfast in the time it takes to make a piece of toast.  For real...this is my favorite food trend of 2018.  


Jack and the Beanstalk

You can catch my television segment for KUTV Fresh Living by following the link.  We would love to see your creations.  Send pictures to me at my Instagram by tagging @tweetledeedesignco.  I can't wait to see what you and your little ones create!


Read more »

Printfriendly