We are thrilled to introduce the latest addition to our Wilde Bloem Quilt Collection—the Wilde Bloem Indian Paint Brush Cross-Stitch Pattern and Kit! Inspired by the vibrant beauty of the Indian Paint Brush wildflower and the timeless charm of quilt motifs, this cross-stitch design brings a touch of folk art into your stitching projects.
A Stitching Tribute to Nature and Heritage
This striking pattern captures the essence of the Wilde Bloem Quilt Collection, blending geometric quilt-inspired shapes with bold, prairie-inspired hues. The Indian Paint Brush flower, known for its fiery red and golden tones, symbolizes strength, resilience, and natural beauty—perfectly reflected in this design. Whether you're a seasoned stitcher or a beginner, this pattern offers an enjoyable and rewarding project that celebrates tradition and creativity.
Available as a Pattern or Full Kit
Choose from:
A Perfect Addition to Your Home or Gift Collection
The Wilde Bloem Indian Paint Brush cross-stitch design is perfect for framing and displaying in your home, adding a rustic, handcrafted charm to any space. It also makes a meaningful and heartfelt gift for fellow makers, nature lovers, and quilting enthusiasts.
This new design is now available in our shop as both a pattern and a full kit! Head over to our website to grab yours and add a touch of prairie-inspired beauty to your cross-stitch collection.
Happy Stitching!
Celebrate, Dream, Create ✨

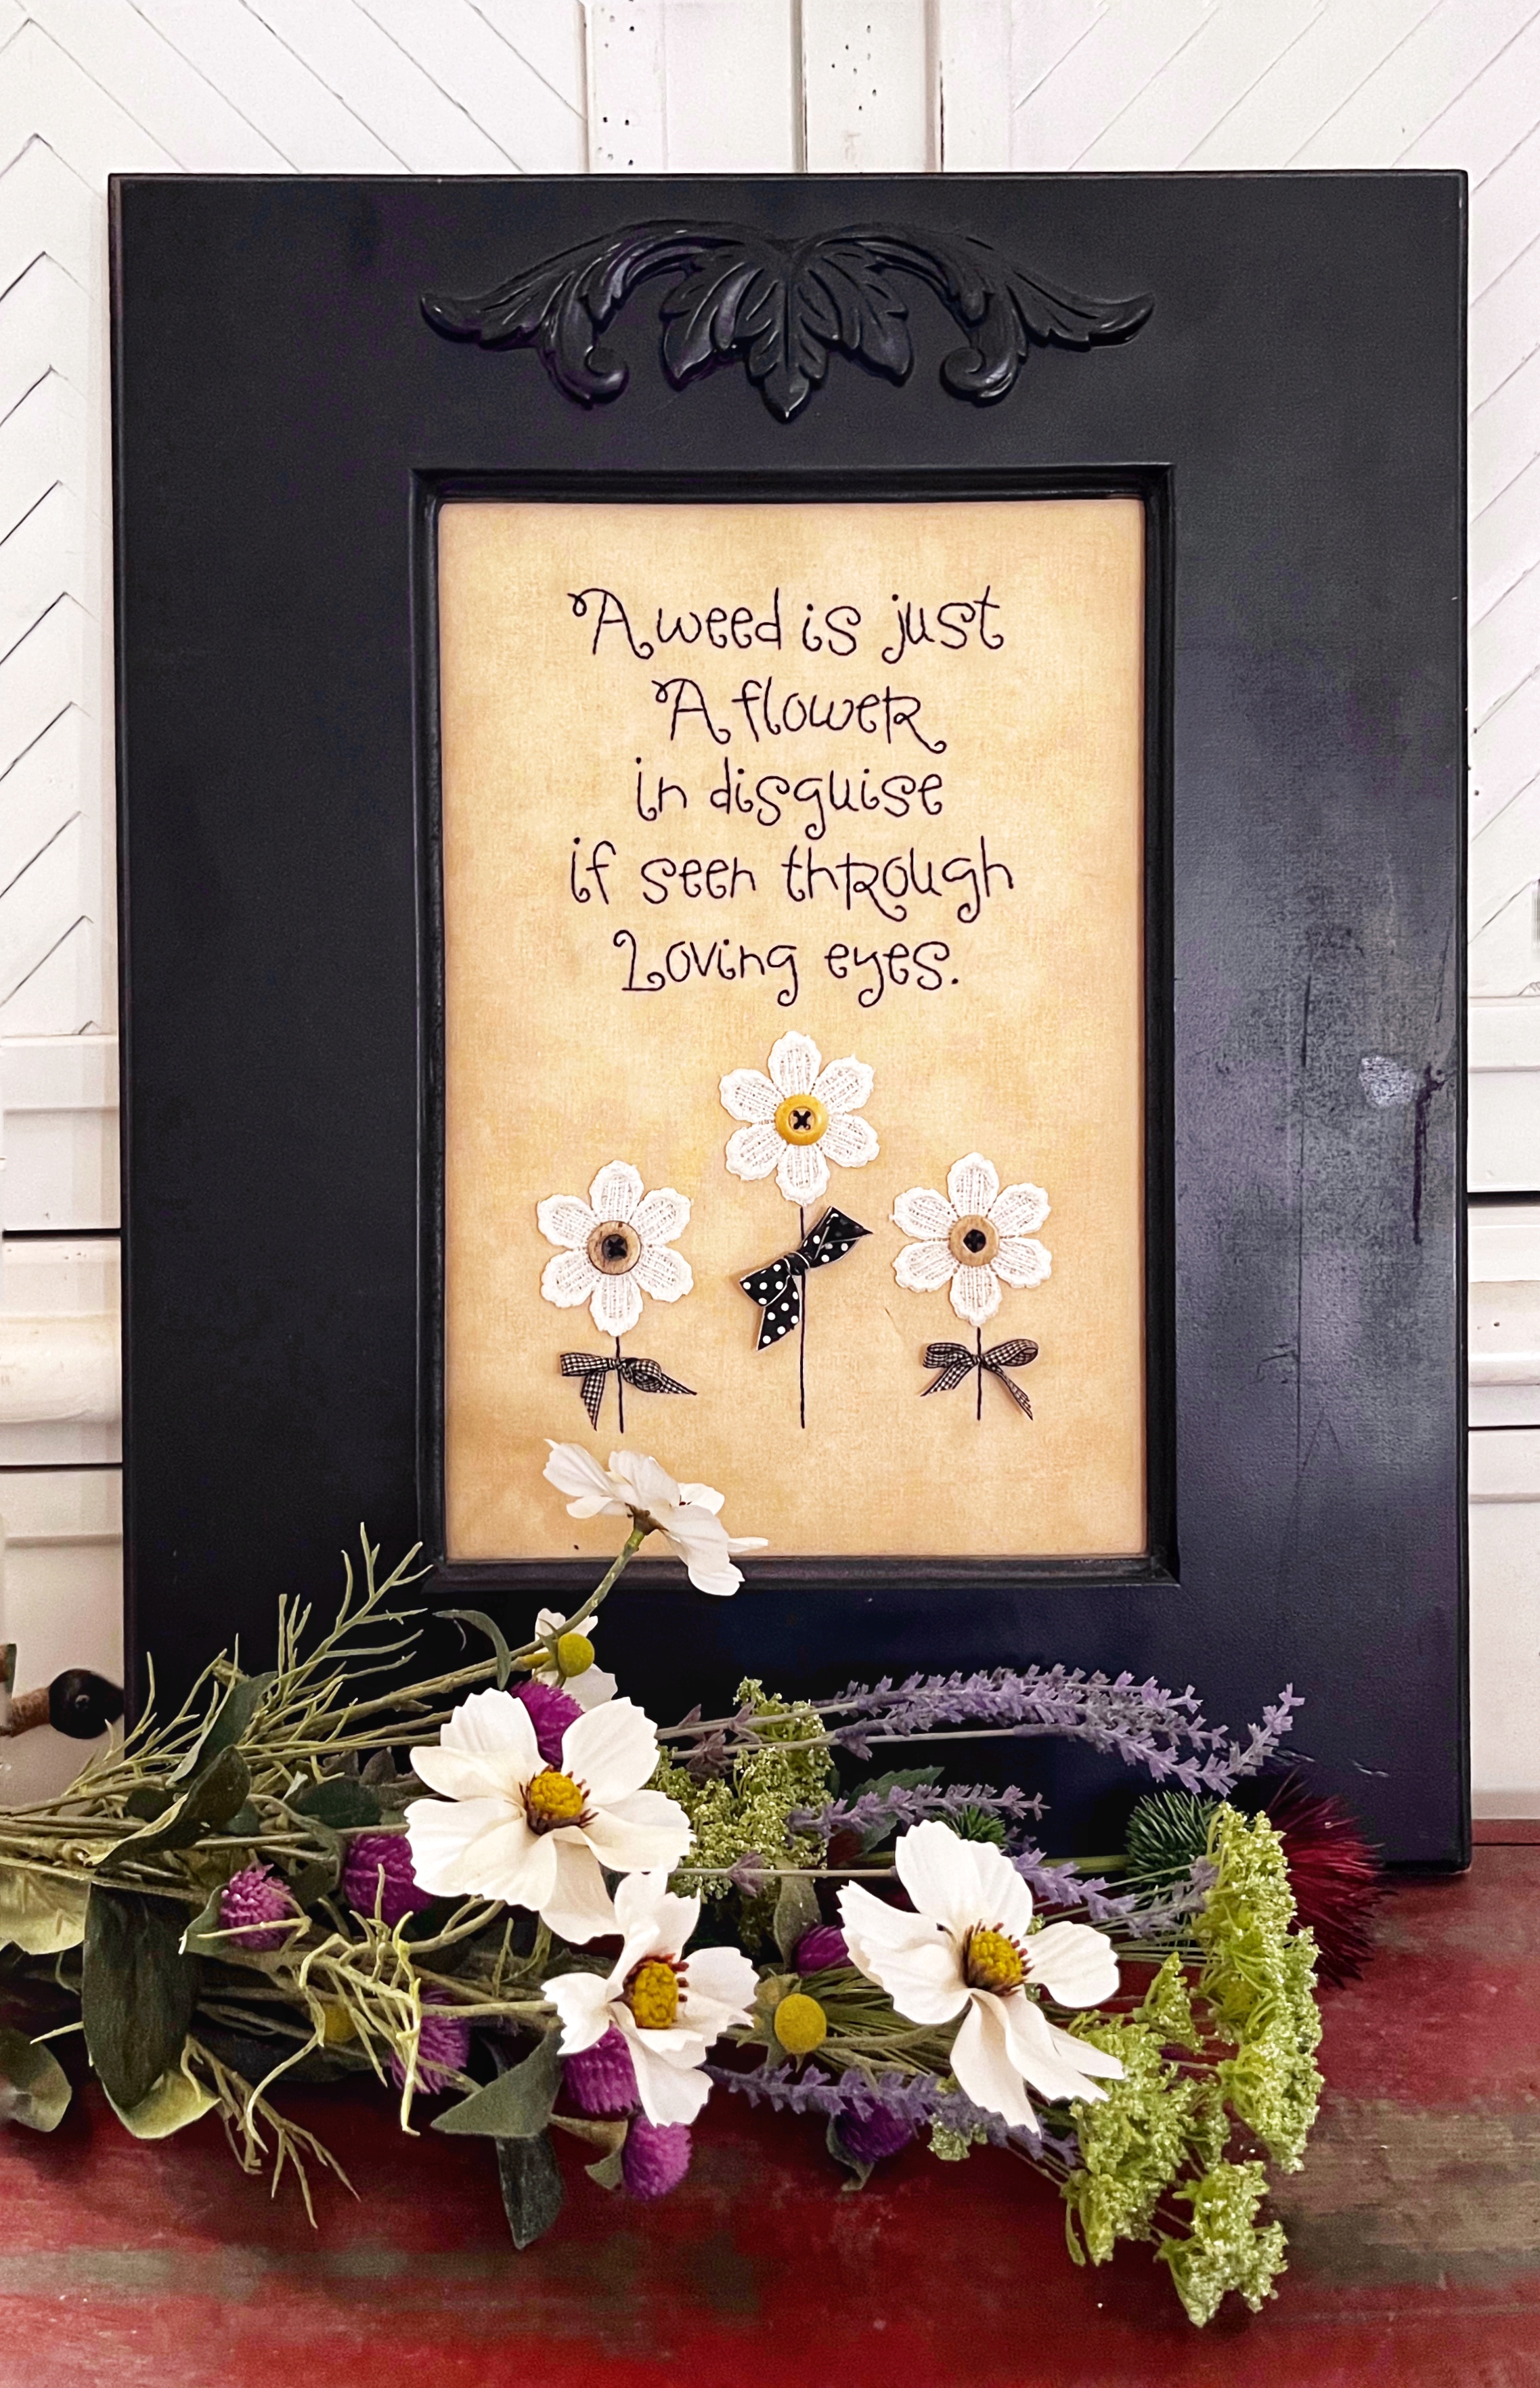
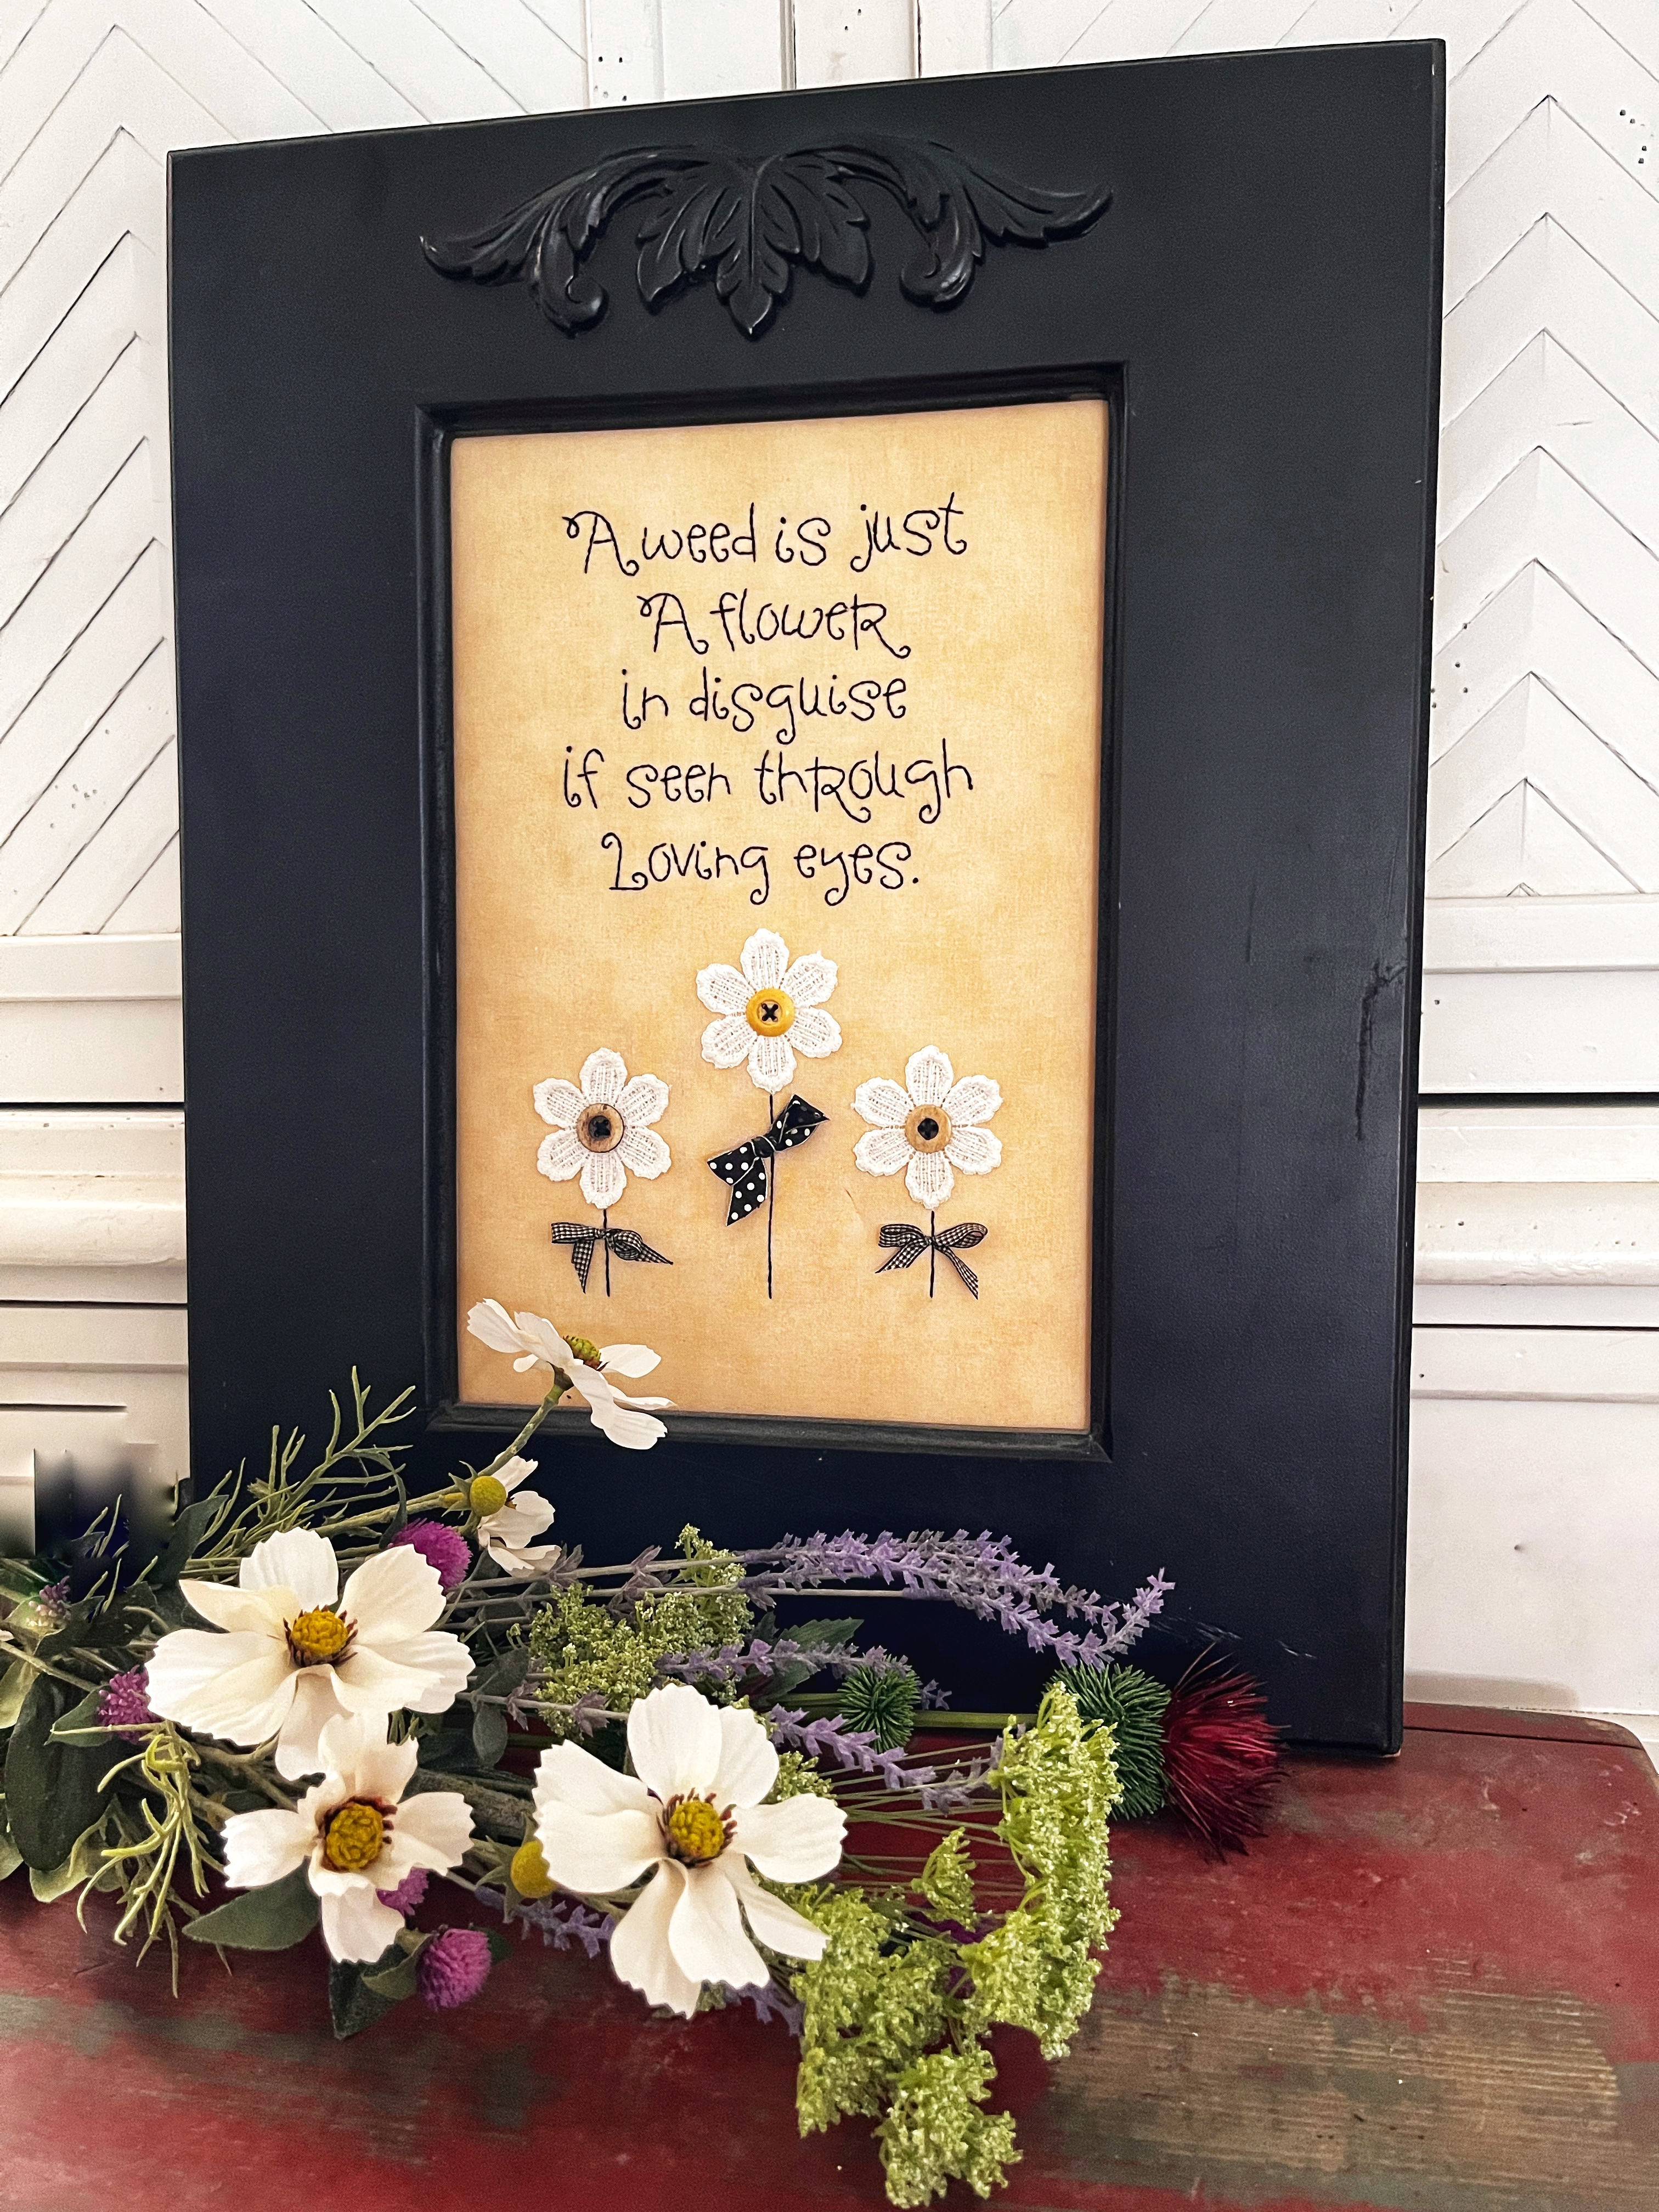
A weed is just a flower in disguise if seen through loving eyes. I have loved this thought for so many years. It was hand-written into the cover of an old book gifted to me by my husband, and of course it found it's way into one of my most loved embroidery samplers.
This saying is loved for the reminder that all things can be seen as beautiful and can hold value when seen with love. In my drawings, paintings and natural dye processes I have found the most deep and beautiful colors in what some would call weeds. All creations on earth were created by a creator whose nature is love.
In our shop we have kits and frames for this embroidery sampler. It is stitched on hand dyed fabric, simple black and includes lace flowers, wood buttons and ribbon leaves. Also included in the kit are hoops, needle, snips, marking pen, and batting. The frame for this piece is also available in our frame collection.
All of the basic stitches in this piece are added to our Tweetle Dee YouTube Channel. I am often asked how long it takes to stitch a piece, so I track it for you. This piece took two evenings to stitch and just a few minutes to frame. The finished size fits in a 11" x 16" frame as well.
We hope you feel inspired to embroider along with us. We all need a reminder to see each other and all of nature through the eyes of love.

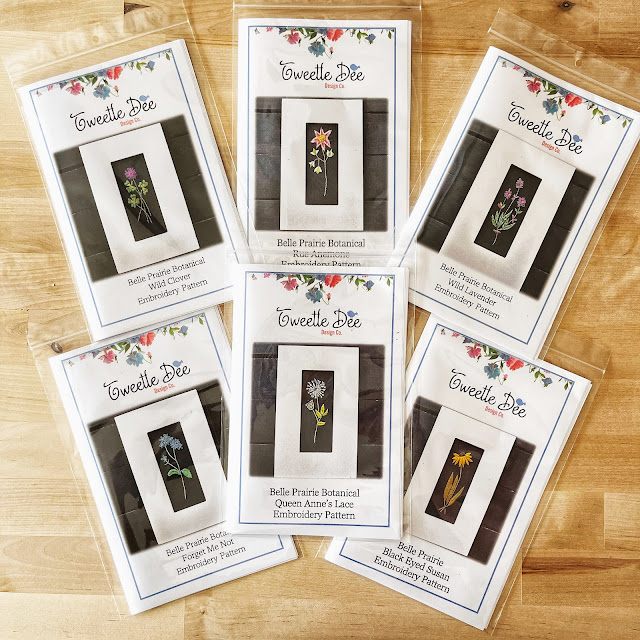
Our love of flowers runs deep as the roots here at Tweetle Dee and one of our favorite collections in the Belle Prairie Botanicals. They were inspired by the Friendship Garden in Belle Prairie, Nebraska. This garden was grown by the women who helped settle the prairies. It was a grown as a way to give flowers to each other in the absence of florist shops.
Rue Anemone
Wild Clover
Black Eyed Susan
.jpg)
Forget Me Not
Queen Anne's Lace
Wild Lavender
We are excited to announce that the collection is growing with two new botanicals coming in September and even more exciting, the collection is now available as a PDF download pattern. We still have many kits available, but now you can order the patterns straight to your email inbox!
All of our patterns and kits are 25% off through the end of August with code Fall25. We hope these Belle Prairie Botanicals inspire you to start stitching again. I'm so excited for the release of our two new florals, so keep an eye out for their release. Have a wonderful last few days of August!
What a crazy time in our lives with the drastic changes to our everyday hustle and bustle do to the illness that is affecting most of the world. Most of us are being asked or compelled to stay indoors, our ability to work has been altered, and for sure we miss the association with family and friends. We were in California when the state cancelled everything, then our home state of Utah closed down...and then more and more. By the time we came home, we we felt lucky to find food in four different grocery stores and even more fortunate to have a box of toilet paper from Grove on our doorstep.

After unloading our van, which was loaded with 600 kits for our California Pinners classes (which didn't happen) and cleaning the house from top to bottom, we both took a deep breath and our hearts felt heavy. Heavy for everyone whose lives have been changed, and especially for those who are sick and lost. It took a day or two to get into a new rhythm. Mike had to restructure a few of his remodeling jobs and I had to cancel most of my teaching/workshops for the spring. And once that was through, all I wanted to do was go pick up this Flourish embroidery hoop with all of it's warmth and familiarity and stitch.
Hand stitching is a comfort to me. I picked it up as a single mom years ago, and stitched my way to sanity and a little joy with each piece I worked. I have found that when life gets turned upside down, finding something you love to do with your hands that is simple and familiar can settle what seams out of control. It seems like each stitch is one thought going up through the fabric of consciousness and then back through the cloth and out of mind.
I have been working on our Flourish Wildflower Embroidery Hoop for two years, which makes if even more loved. Slow stitching at it's best. This month's flower is the Salvia which is a member of the Sage family and it represents the virtue of grace. I though about how grace fits into this time in our lives. If you take the meaning of grace as being accepted for where you are, loved for who you are, and acceptance. It makes perfect sense this value is something we all need right now.
Each of us has been affected by the virus that has changed our world, and we all handle it in different ways at different times. One moment we feel energetic to make a difference and the next we can feel like the world is heavy on our shoulders. I have to admit, high stress slows me down, until I get back in a grove. I accept this about myself. I refuse to judge myself for the feeling that weigh my heart down at moments. I choose to give myself a little grace, forgive the negative thought and choose a better way. It is all grace...all love.

When I went to stitch this sample, I decided to through a curve and add thin silk ribbon to the varied blue blossoms instead of embroidery floss. I wanted a little extra texture to the Lazy Daisy stitches, and I am happy with how it turned out. You can watch a highlight video on my Instagram on how to stitch them with silk OR you can go to the Tweetle Dee You Tube Channel and watch how to stitch the Lazy Daisies with floss. Either choice will be beautiful.
The stem was a simple Back Stitch with a variegated floss which I then wove a secondary thread through each of the stitches to give the stem a little extra texture.
The leaves are a little different. If you look closely at the leaves of the Salvia flower they have delicate little "barbs" of them. So, I created a base for both leaves with a Satin stitch across the width of the leaf, following the shape to the points. Once that was filled in, I made simple stitches up the center to create the "vein", then I made long straight stitches from outside the satin stitched edge into the center to meet up with each of the straight stitches.
This created the little "barbs" and added a little something extra. The thread I used was a varigated pearl cotton type thread from Sue Spargo called Eleganza Bird's Eye. I love her thread collection for embroidery. The way her pearl cotton is woven creates quick color variations and it is silky smooth to embroider with. Plus, let's talk about the dimension it brings to my embroidery! No other floss can give the umph her's does.
The silk ribbons I used were from a company named Thread Nanny. They offer collections of thin dyed silk ribbons that come on spools. This is helpful because it eliminates some tangling and ware that comes when suppliers "bunch" up their ribbons. Pulling their ribbon off a spool makes it smooth and straight, ready for stitching.
Of course, the word "grace" is stitched in Ecru DMC Pearl Cotton and is made with a simple back stitch...tiny stitches needed to get around the curves.
To download the patter for the Salvia & Grace Flourish Wildflower, right click on the image and print it OR you can trace it right off of your tablet screen onto your fabric with a Pilot Frixion Pen.
I speak for both of us in wishing you all the love, protection, and blessings you need to get through this health situation. If you need a virtual hug, reach out to us through a DM or email. We love you and thank you for your support for our little home business. It was created out of love and we hope you find some inspiration and hope here.
Keep celebrating, dreaming and creating
A field of flowers, a basket of weeds and a wilting seed pod all the bounties of the mountain we live on and love and now they are forever sealed into our hand dyed stitching cloth and in Our Shop for you to stitch, piece, and quilt with.
Tweetle Dee Hand Dyed Stitching Cloth
The inspiration for the Hand-Dyed Stitching Cloth came from my boredom with flat colored embroidery cloth. You know I love depth of color and texture in all of my work whether it is in paint layers, hand- variegated threads, or fabric, I want my pieces to look well-loved, or vintage. I adore the faded colors of these stitching pieces.

With each batch we brewed, the colors out of hiding and the water baths were like a cherished prize wine. As the cotton linens were added to the pots we could see those beautiful living colors blend into the fibers making each piece unique with the folds of the fabric and pockets of dye.
This process is done for each batch of stitching cloth. It takes a lot of love and time to make each full fat or half fat perfect. We fell in love with this little bit of extra to each of my embroidery pieces. As you stitch you will too, knowing that those colors came from a hand picked bloom, seed, or weed and now add that little something special to your embroidery or quilt piece.
You can purchase all twelve colors in The Shop in a Full-Fat 22" x 22" and a Half-Fat 11" x 11". Whether you use them for quilting, slow stitching or embroidery, you will love stitching with these fabrics!
One of my favorite quilts of all time was this super simple Kaleidoscope of Fabrics Quilt that I made with my daughter. She loved boho florals and did not want them cut up into little pieces. All she wanted was them framed so each block print stood out. Most of us have a collection of prints we just can't think of cutting up, and this simple and quick quilt if the perfect pattern to show case them. It is also a super simple quilt for beginners!
This quilt only took two hours to make (minus the shopping and machine quilting)...and is so easy that anyone could make it. It is a throw size (64 x 85)...perfect for a bench, couch, or corner of a bed.
Materials
12 fat quarters
1 3/4 of fabric for sashing (borders)
5 yards for the back &
3/4 for the binding
Cotton batting (twin size)
Thread, rotary cutter, mat, ruler, iron
Instructions
1. Trim all of the fat quarters to 18 inches square using you rotary cutter, mat and ruler. Press.
2. To make the sashing (in-between borders), cut 15 strips of fabric 3 1/2 inches wide. Then cut across four of the strips to make eight pieces that are 3 1/2 x 18 inches wide.
3. Cut three of the long strips in half and sew five of the half pieces to the ends of five strips to make five strips that are 3 1/2 x 59 inches long.
4. Cut one more strip in half and sew each half-piece to the ends of two strips to make the side borders.
5. Press all of the strips.
6. Lay out all of the 18" squares on a floor or large surface in the pattern you would like.
7. Using a 1/4" seam, sew one 18" long sashing strip to the side of the top left block square (right sides together). Press.
8. With right sides together again...sew the next block square to the other side of the 18" strip. Press.
9. Continue this process until all four of your rows are stitched together.
10. Then you will take the top row and carefully pin one of the 59" long strips to the bottom of the row (right sides together) and using a 1/4" inch seam, stitch it together. Press.
11. Sew the row together using the remaining 59" sashing strips.
12. After the rows are sewn together you will pin the top border and bottom border to the top and bottom rows and sew together. Press.
13. Lay out the remaining two long strips onto the quilt top and pin to the top (right sides together). Make sure the seams in the border strips are laying where you want them to. Trim off any of then excess border...and stitch together. Press. Hurrah...you quilt top if now done!!!
14. Measure the baking fabric and seam it together to cover the edges of the top of the quilt. Make sure you leave 3 to four inches all the way around for your machine quilter to use in her quilting process.
15. Iron the top, and back using a spray starch for a little stiffness. This will help the quilter as well.
To finish the quilt either machine quilt it or enjoy the process of slow stitching it together. I had a dear friend quilt mine with an all over floral pattern that matched the flowers in the block squares. A special polka-dot block had a heart stitched into it.
16. Once you have it quilted, you will want to bind it. Cut eight strips 2 1/2 inches wide for your binding. You can find instructional videos on binding techniques on the web....maybe I will need to make one myself.
This darling quilt was made with love for your daughter and has been shared with her family and friends on picnic, beaches visits, and whenever a warm "hug" from home was needed. It was so easy to make it is the perfect quilt to make as a gift. So find your favorite collection of fat quarters and start sewing your own Kaleidoscope of fabrics into a quilt of your own.
One of the best parts of my job is getting to try new things and though I am not new to weaving (see previous posts), making a weaving loom on an embroidery hoop was completely new to me! After testing it out, I am in love with this form of weaving. If you have used a loom before, you know that it can be somewhat precise with a little bit of randomness, but when you create a loom out of a simple embroidery hoop, all of your weaving becomes random! Which you know if my thing.
Randomness with tons of texture is really my thing....just saying!
To create a round Embroidery Hoop Weaving you will need a simple wood embroidery hoop that you can pick up at any craft shop and some yarn or string. That is the beginning of something fabulous! You will want you yarn or string to be thin so it will disappear into your weaving and not stand out between "stitches".

1. To begin, take the outer hoop off and set aside.
2. Tie a simple double knot to the top of the hoop with the lightweight yarn or string. Make sure to leave a two to three inch tail for later.
3. Wrap 4 or 5 yards of yarn/string around a shuttle and cut off of the skein. I used a make shift shuttle (a glue stick). You want it small so you can work it around the inside of a tiny hoop.
4. To begin wrapping you go across the hoop to the opposite of where you ties it on and holding it tightly, wrap the string under the hoop.
5. You are going to bring the shuttle of string up to the top and off to the right about one inch from where you began, and go across the top holding tight. Wrap it under the hoop and...
6. ...cross over the center and go under one inch to the left of the first loop. In essence you are making figure eights all the way around the hoop going over and then under keeping the yarn tight.
7. Continue wrapping the yarn/string every inch until you get to your starting point. The center will look like a messy "Cats's Craddle". It's ok!
8. After you arrive back at the starting point take the shuttle and wrap it around the middle cluster of yarn. Think it like a clock center that you are going to wrap the string around several times at a 12, 3, 6, and 9 o'clock time place. Pull tight. This will bring all of the threads into the center.
9. Once you have wrapped the string around the center a few times, pull the string up to your starting point and knot the string to the tail from the beginning knot.
10. Trim off any access and tightly push the outer round of the hoop onto the inner warped loom! Yes, it is now a loom not an embroidery hoop. So cool huh!
I always begin my weaving with a pretty center. I find it best to either use the same yarn/string you used for the warp or another thin yarn. Use a yarn needle (available at any yarn supplier) and knot the end of the threaded yarn to the the back of one of the spokes. This will secure it.
Bring the needle up and do a simple over and under each of the warp strings to create a small woven circle. You can make it larger if you like, but I usually keep mine to about the size of a dime or quarter.
Once you have your center secured, wrap the end of the yarn piece under a spoke and you are ready to add more. I love to use wool roving in my weaving. The colors and poofy textures make the piece extra special and fill in gaps quite quickly. You can finds wool roving on Amazon or at most craft stores. It will come in a ball which can be unwound and separated to get the thickness or width you desire.
To make this yellow wool center, I used a simple Tabby method of looping the wool over and under alternating spokes, tucking and poofing it up to get the look I desired. This is what I mean by randomness. You can play with different yarns and wool, fabric too to make your weaving unique to you!
Here I added a thick grey yarn by tucking the end under a spoke and coming up to the front. Once I had my yarn on the top of the weaving, I wrapped it around each spoke with a simple loose knot and then after a few rows, I skipped every other spoke to give it a larger stitch. No needle needed!
For the next layer, I made a wood shuttle and strung some thick variegated yarn through the weaving by going over and under each spoke. As I went around I used my fingers to push the layers close together which created a cool fan type pattern.
I continued to do this with the blue yarn and will finish this one tonight with some of the thick wool white roving as a braid around the outside. Weaving is one of those arts that is simple, but takes a little faith. When you begin you will for sure think you are doing something wrong because it "won't look right". Trust me, I know. Every weaving I feel that way until I keep going and then it magically takes shape.
I hope this has inspired you to take out one of your unused embroidery hoops and your bin of wool yarn and make something fabulous! You can watch my KUTV Fresh Living segment to see a hands on tutorial for how to warp your hoop into a loom! I'll post the link as soon as I have it.


.jpg)


.jpg)
.jpg)
.jpg)


I just love those embroidered flowers on natural fiber. Very nice and refined work.
ReplyDelete